Showing posts with label sew. Show all posts

8.19.2015

DIY Grid Patterned Pillows

I'm so in love with all things grid patterned.  I might have a pillow problem, but don't most women.
These new DIY Grid Patterned Pillows I made are my new favorites.  You'll be seeing a lot of them.
They kind of work well in every room in our house.  That's the beauty of black and white and a simple pattern like grid, it works with every style and color palette.


You only need to know how to sew a straight line to get these high end looking throw pillows.  Head over to Curbly to see the full how-to tutorial!  I promise, these really are cheap and easy to make!!!! 

5.20.2015

DIY Tropical Leaf Pillow

If you are going to change up your decor at all, pillows are the first place to start.  They are an inexpensive way to play with color, pattern and trends.  Because I like to sew, I enjoy making pillows so that I can save money and also have a unique look.


I'm loving this tropical foliagetrend. I've made a tablecloth and an alphabet chart with big leafy botanicals, so why not a pillow? This is another house plant that I don't have to worry about watering.


To see the full how-to for making this easy applique pillow, head over to Curbly today.

2.26.2014

Little House Door Stop


I'm on a roll with my new Cricut Explore.  I'm having so much fun this machine.  Today I made this cute weighted little house door stop.  I'm so pleased with this simple project.


First, I cut out this cute house in white vinyl, it's one of the 99c images in the new Cricut Design Room.  Then I ironed it onto a piece of fabric about 1.5 inches wider the house shape.


Stitch the fabric together leaving a 3 inch opening on the side.  


Slip a sandwich sized ziploc bag into the opening and fill the bag with sand.  This is the weigh down the door stop.  When the bag is full, close it and tuck the bag into the little house.  Position the bag of sand at the bottom of the house.


Fill the rest of the little house with polyfill to give it a good full looking shape.


Then simply stitch in closed by hand.  Now how easy is that?  What a fun way to hold back a door that just doesn't want to stay open.  

2.26.2013

Green and Gold Geometric Pillow


To keep with my love of triangles and geometric patterns, I decided I would make a fun green and gold pillow. I had so much fun with my giant geometric heart, that I'm working on lots of fun green geometric ideas for St. Patrick's Day and Spring.  While my love of the color pink is new, green has been my favorite color for as long as I can remember.  

I chose 3 green cotton fabric and a metallic gold for the triangles. I knew I wanted to add a splash of metallic gold, but this fun, fabulous, shiny, slick gold fabric is very synthetic and very difficult to work with. For the design, I wanted it to be very random so I just cut out a lot of triangle and played with their placement for quite a while.  I cut 5" squares and then cut those squares in half diagonally. To piece this mini quilt pattern, I sewed the triangles together to make squares first, then I sewed the squares together in rows, and finally sewed the rows together to make a 20" square for the pillow.  I backed the pillow in the darkest green fabric and put in an invisible zipper in the bottom seam of the pillow.


I am going to be totally honest with you though. This pillow just about kicked my butt. I started this pillow Sunday evening thinking it would a fun little project that would take an hour or two of my time. But, after fighting this fantastic gold fabric for hours, I managed to accidentally touch a hot iron to one of the middle triangles and it instantly melted it. So, I had to unpick way too many squares and then replace the melted piece and sew it back together again.  So, IF I attempt this again, I will be on the hunt for better gold fabric to work with.  


Do you ever get yourself into a sewing project that you think will be a breeze and then hours later your unpicking your mess and wanting to cuss?  If you have, I feel your pain. But if your stubborn like me, you won't let that project beat you.

10.29.2012

Wizard of Oz Halloween Costumes

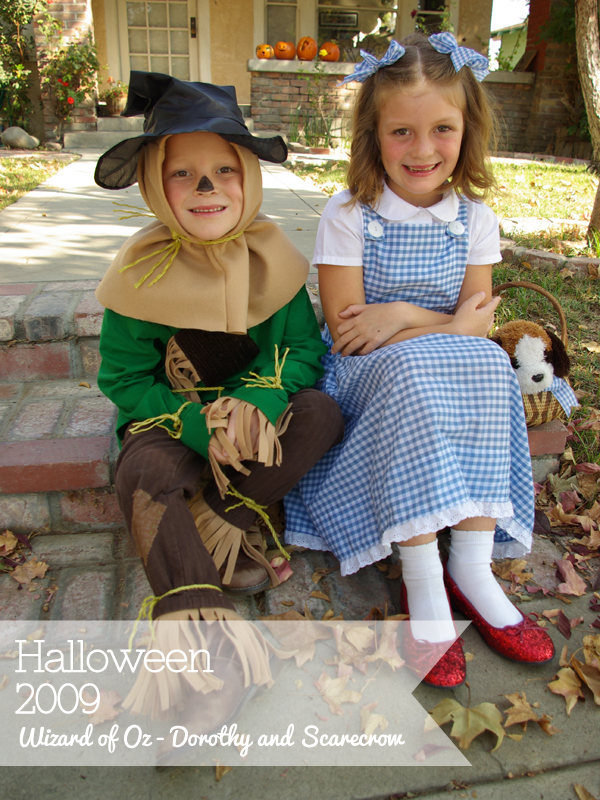
These Scarecrow and Dorothy costumes are classics.  All the characters from the Wizard of Oz make fantastic Halloween costumes.  Denali and Dylan had watched the movie that year and decided very early that they wanted to be Dorothy and the Scarecrow.


I'm sure there are a lot of patterns out there to follow, but I just decided to make my own simple versions. Dorothy's dress was a simple, buttoned, bib front, blue gingham dress that I edged with eyelet lace.  Denali wore a white collared shirt and a pair ruby red slippers (of course).  She ended getting a lot of mileage out of those red sparkly shoes.  They worked really well with her Christmas dress.  She also carried Todo in a basket.

The scarecrow costume was also quite simple.  I used an old pair of Dylan's pants and bought a green long sleeved t-shirt.  I used tan polar fleece fabric for the straw.  Then I just sewed all kinds of patches onto his clothing.  I made his hood out of more fleece and attached an inexpensive witch hat to it.  Then I just tied rope around his ankles, wrists and waist.  Dylan made sure to stay in character most of the night and flopped around and tripped often.


Last night our church had their Halloween party, so the kids wore their costumes.  It's kind of fun that they get to wear them more then once.  I'm kind of relieved to have them done and ready to go for Halloween.  Are you still working on costumes?  Or are you trick or treat ready?  What are your kiddos going to be this year?

You can see more of our Halloween costumes by clicking the links below.

9.20.2012

Fabric Party Goody Bags


Every party has to have a goody bag for all the guests to take home.  When I was a kid, my mom threw us the most fantastic themed birthday parties.  She always decorated a cake, and usually sewed goody bags to go with the theme or colors of the party.  She did all this all in Papua New Guinea - the remote, very tropical, 3rd World, island in the South Pacific.  When I started throwing my kid's birthday parties (11 years ago - eek), I wanted to continue her tradition.  So, for most of my kids parties, I have sewn goody bags for the guests (I'll have to find them all and share pics with you sometime).


For Olivia's 1st birthday, I needed to make something with scooters on it.  But, I just couldn't find the perfect fabric.  I wanted something with both the pink and minty green, and I definitely wanted scooters.  Months ago I picked up this cute scooter fabric and this sweet minty green floral.  I decided to use both fabrics for the bags.  I made 12 bags with 1 yard of the green floral, a swatch of the pink scooter fabric, a little square of heat 'n bond, and 1 spool of grey satin ribbon.  I'm pretty proud that the  grand total was under $9 for all 12 bags.

These take very basic sewing skills to make. And if you get an assemble line going, you can have them all made in just over an hour.  I have lots of step by step pictures for you to follow.

Start by cutting out the rectangles for the bags.  Using 1 yard of fabric and making 12 bags, you need to cut rectangles that are 6 1/2" by 16".  This will give you finished bags that are about 6" by 7".  Also iron on a piece of heat n' bond to your accent fabric (mine is the scooters) and then cut out the shape that you want to adhere to the bag.


Fold the bag piece in half and iron on the scooter shape where you want it.


Fold the bag good sides together now and stitch down each side with a 1/4" seam allowance.


Now, fold down about 1/4" of fabric around the top of the bag.  Iron this flat.


Then, fold the top down again, this time just less then 1".  Iron it flat again.


Stitch down the top of the bag.  I sewed mine 6/8" seem allowance (I have that marking on my machine).  Turn the bag right side out.


Now you are going to use a seam ripper to open a small bit of the seam so that you can thread the ribbon drawstring through.


Using a large safety pin, thread the ribbon through the opening and tie it off.

And really these are such great keepsake from parties.  My kids use past birthday bags for all kinds of things.  They store their favorite rocks in some and use them for toiletries when we travel.  Do you have birthday traditions for your kid's parties?

6.13.2012

DIY Mix and Match Pattern Napkins

So, this is what I whipped up Sunday afternoon.  I'm one of those weird people who likes to have a little project in order to relax.  Don't get me wrong, a nap is nice, but I find a finished product more satisfying.  I had done cleaning, laundry, and cooking all day Saturday and just felt like I needed to make something for a change in pace.


I love to use cloth napkins.  There is something about them that makes dinner just a little more special.  I've been wanting some new napkins, something graphic and and great for casual events.  I love mixing and matching patterns, and napkins are a perfect way to do this.  I've had these 3 fabrics for a while now, just waiting to use them is some fun way.


To make a set of 6 napkins, you will need 1/2 yard each of 3 patterns.  Wash and dry the fabric before you cut it (you don't want it shrinking on you after you cut and sew it).  Use a rotary cutter and mat for best results and cut two 18" squares from each piece of fabric.


Using an iron fold over the helms one side of the napkin at a time.  Fold over 1/4", iron and then fold over again another 1/4" and iron.  I didn't do anything fancy of the corner.  And then I just simply sewed all the way around the napkins, being sure to backstitch a couple times on the corners to keep the secure and in place.


Really a set of six is not going to be enough for when I'm entertaining.  So, I'll be on the look out for other graphic black and ivory cotton patterns to add to this set.


Making mix and match pattern napkins leaves you with endless possibilities.  Think of all the patterns and colors out there.  Do you like mixing patterns?  Does this seem like a sewing project you might attempt?  

5.06.2012

Chevron Baby Quilt

Well, I finished it this week.  I shared my pattern for this quilt a while back.  But when
I found out my brother and sister in law's baby shower was this weekend, I had to put my rear in gear and sew like there was no tomorrow.  And that's what I did for 3 days straight (hence the lack of posts this last week).


I am so excited about how this quilt turned out.  I want one now too.


I had fun with the back of this quilt too, and decided to add a little pattern.


For this quilt I cut 5" squares and then cut them in half to make triangles.  Each row is 12 triangles across and I made the quilt 10 rows in length.  Then I added a 2" white border and a 4" teal border.  I made my own binding and used this fantastic tutorial from See Kate Sew.


12.22.2011

Christmas Aprons


Growing up we all had Christmas aprons.  A good friend of my mom's made them for all of us.  I remember unpacking them every Christmas.  They were so much fun to wear.  I'm a sucker for Christmas traditions, so this year I thought I needed to make my kids some aprons.  Denali and Dylan both love helping in the kitchen, and I'm sure Olivia will love it very soon as well.  So, yesterday in the middle of all my craziness I made 6 children's aprons (3 for my sweet friend Heidi's creative kids, 1 each for Denali and Dylan, and one for my very cute nephew Liam).  I probably should have done these months ago, but I work best under pressure.

Liam's Russian Nativity Dolls apron has a green polka dot pocket.
I added D rings to the neck straps to adjust the length.
Dylan's woodland animals apron has wide red ric rac along the bottom.
Denali's Retro Santa Scooter fabric has a large, 2 compartment pocket.
 I bought these fabrics with no project in mind.  I just thought they were too cute to pass up.  But later, Aprons seemed to be the perfect use for them.  Do you ever do that?  Find cute fabric and buy it not knowing what you will do with it.  It's kind of a problem.


I will include a pattern on my blog in the new year (I just have too many things to do in the next 2 days).  But, these would make great gifts anytime of the year.
Related Posts Plugin for WordPress, Blogger...